
7 Ways to Organize Instagram Reels
Organize Reels with buckets, consistent covers, pins, caption tags, archive rules, and a posting order to keep your profile clean and scannable.
Organize Reels with buckets, consistent covers, pins, caption tags, archive rules, and a posting order to keep your profile clean and scannable.
4.98 /5 - from 58k reviews
Trusted by 50,000+ creators — get real engagement delivered to your profile in minutes, not days.
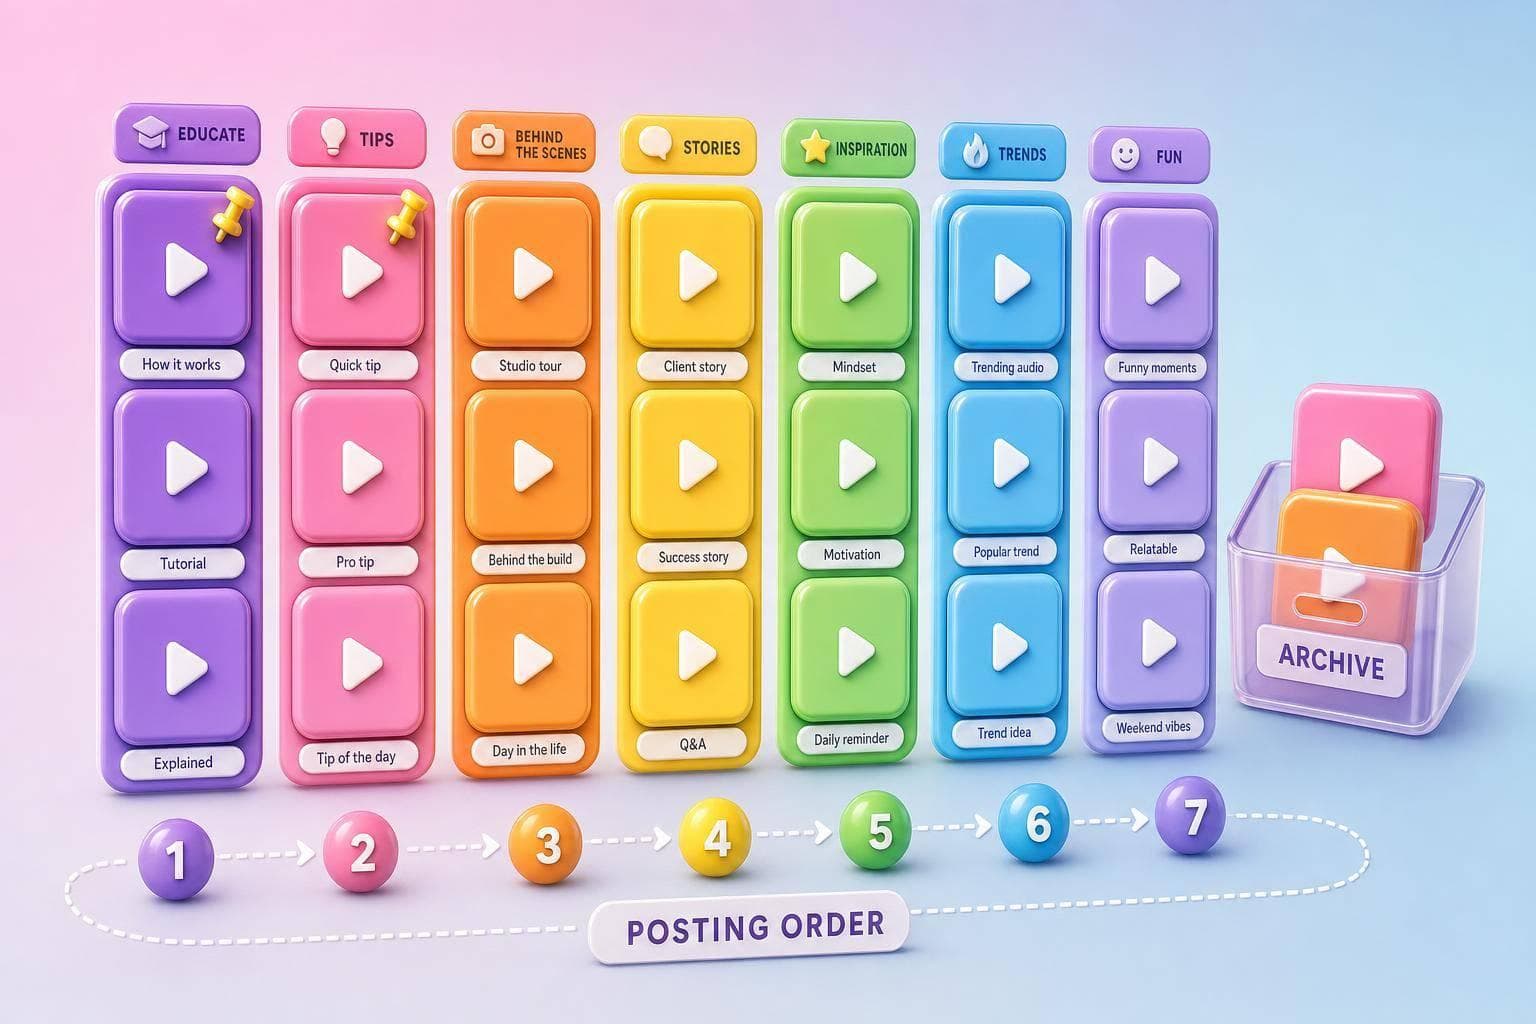
A messy Reels tab can cost you followers in seconds. If I want my Instagram profile to look clear and easy to scan, I need a simple system before I post more.
Here’s the short version: I can organize my Reels with 7 moves:
A few points stand out fast:
| Method | What it helps with | Effort |
|---|---|---|
| Topic buckets | Planning and sorting | Medium |
| Series labels | Repeat formats and navigation | Medium |
| Cover style | Grid appearance | Low |
| Pinned Reels | First impression | Low |
| Caption tags | Search and tracking | Low |
| Archive rules | Cleaning old posts | Medium |
| Publish order | Content flow | Medium |
My takeaway: if I want the fastest visual fix, I’d start with covers and pinned Reels. If I want a system I can keep using, I’d add buckets, caption tags, and archive rules next.
That’s the core idea of the article: make the profile easy to understand, make posting easier, and keep the system simple enough to use every time.
New visitors size up your account in seconds. If your Reels tab looks messy, that first impression can cost you follows.
There’s a second upside too: organization makes posting a lot easier. Instead of scrambling to decide what goes up next, you can work from a repeatable system built around topics, formats, and a steady posting rhythm.
That kind of clarity starts with a simple setup for how you sort, label, and show each Reel.
Use the seven methods below to make that structure visible on your profile.
A topic bucket is a set category you assign to each Reel before you post it, like "Tutorials", "Client Wins", "Behind the Scenes", or "Product Demos."
Think of topic buckets as your internal planning system. They help you stop posting at random and start seeing patterns.
Start by sorting your existing Reels into a few clear categories. Look at your last 20–30 Reels, group them by what job they do, and cut the list down to 3–5 core buckets.
Once you’ve set those buckets, tag each Reel in your planning doc with a short label like TIP or BTS. That makes your content calendar easier to scan, and it also makes series labels easier to handle.
Then track performance by bucket. Pay attention to:
This shows you which types of Reels are driving growth.
For example, a fitness coach might use buckets like workouts, nutrition, client wins, and behind-the-scenes content.
Once your buckets are set, you can start naming your repeatable formats with series names.
Once you’ve grouped your content into buckets, the next step is to label the formats that show up again and again inside each one.
A series label is a steady name or numbering system you attach to related Reels, such as "Form Check Fridays", "Ask a Realtor", or "Beginner Spanish, Part 5."
This matters because a clear label helps viewers spot the format right away and find the next episode without hunting for it. Over time, that turns your profile into something people can recognize at a glance.
Use:
Put the label on the cover and in the first on-screen frame. Then use the caption for the full series name. For example, the cover might say "Content Tips 4", while the caption reads "Content Tips, Episode 4: How to write better hooks." This is a key part of creating Reels that go viral.
Keep the system simple. Pick one naming template, like Series Name + Episode Number, and stick with it every time. It saves time and makes your profile feel organized.
It also helps to save a reusable cover template, so all you need to change is the episode number or topic. Then write the rules down in a short doc or content sheet: where the label appears, how episodes are numbered, and which abbreviations you use.
Next, make those series easier to spot with a consistent cover style.
Use your cover design to make Reel categories easy to spot on the grid. When each cover follows the same visual setup - the same font, color palette, and layout - your profile looks like a consistent Instagram aesthetic instead of scattered.
A simple way to do this is with a repeatable template built around a few fixed parts: one background style, one bold font, and a short headline placed inside the center safe zone. Instagram crops Reel covers differently across the Reels tab, the profile grid, and the main feed. That’s why key text should stay inside the center safe zone, so it remains visible in each placement.
If you post different categories, give each one its own color. For example, a fitness creator might use blue covers for workout demos and green covers for nutrition tips, so viewers can tell what the Reel is about before they tap. It adds variety to the grid without making the whole thing feel messy.
Before you post a new Reel, preview the cover next to your last 6–9 grid posts to improve your Instagram grid layout and ensure it doesn’t clash. A cover can look fine on its own but feel off once it shrinks to thumbnail size. And that small mismatch can throw off the grid more than you’d think. Once your covers look consistent, pin the Reels you want new visitors to notice first.
The aim isn’t perfect design. It’s a system you can keep using for every new Reel without rebuilding the wheel each time. Save one master layout, then swap only the headline and color cue for each new Reel.
Once you’ve grouped your Reels by topic and cover style, pin your strongest ones to the top. Instagram lets you pin up to three Reels on your profile, and they stay there until you remove them. Those spots are prime real estate, so use them on purpose.
A simple order works best: intro Reel, proof Reel, then next-step Reel. For example: Start Here, client results, then booking instructions. That lineup helps answer the three things new visitors usually want to know before they follow.
Pinning helps shape what people see on your profile. It does not boost distribution or reach through the algorithm. Think of it as display control, not a traffic lever.
Check your pinned Reels once a month. If details are out of date, or a stronger Reel now does the job better, swap it in. One of the easiest ways to lose trust is to leave an expired sale, old launch, or stale announcement pinned for months. New visitors notice that stuff fast.
To pin a Reel, open it from your profile, tap the three dots in the upper-right corner, and choose Pin to your profile. To remove it, use the same steps and tap Unpin from profile. Next, use proven caption ideas to back up that same flow.
Pinned Reels shape the first impression. Caption tags help people find those same topics later. They act like internal labels for your Reels, which makes planning and review a lot easier.
The first 125 characters of your caption carry the most weight for search indexing. Put your main keyword first, then work in 2–4 related phrases in a natural way through the rest of the caption. So instead of burying the topic, lead with it right away, like meal prep for busy parents or Instagram growth tips. Keyword-focused captions can help your Reels show up in search and make related posts simpler to find later.
Hashtags matter too, but you don't need to go overboard. A good default is 3–8 closely related hashtags per Reel. Put them at the end of the caption after a couple of line breaks so your main copy stays clean. If possible, use one hashtag that matches your main keyword. It also helps to lean into niche, topic-based tags instead of giant broad ones. Hashtags in the 10,000–200,000 post range often do better than mega-tags.
The big win comes from doing this the same way over time. Match each topic bucket with one keyword set and one hashtag cluster. Say you're a fitness coach. You might use home workout, no equipment, and beginner friendly on workout Reels again and again. That gives you a cleaner way to group performance data, spot patterns in analytics, and plan new content without rebuilding the wheel every time.
A simple template can save a ton of time:
Keep that template in Apple Notes, Google Doc, or wherever you plan content. Then copy it, paste it, tweak a few words, and publish. UpGrow's analytics dashboard can help you see which repeated tags lead to follower growth and profile visits.
Next, set simple archive rules so older Reels don't crowd the system.
Archive rules help keep your profile grid clean. If you skip them, old or off-brand Reels can stack up and make your page look messy to new visitors. And here’s the key point: archiving is not deleting. It takes a Reel off your public grid, but keeps it in your private archive with likes, comments, and insights intact. A simple way to decide what stays? Use the same topic buckets and caption tags you already use for planning.
Archive Reels that promote expired offers, no longer fit your niche or visual style, or fall below your usual engagement level after 6 months. But don’t move too fast. Use a two-review rule so you don’t hide a good post too early. Flag it once, fix it once. That might mean updating the caption, changing the cover, or resharing it to Stories. If it still doesn’t land, then archive it.
One more thing: don’t archive Reels with above-average saves or shares just because the view count looks low. Saves can point to real audience interest, even when a Reel doesn’t pull big views.
Review the last 90 days on the first business day of each month. Before you archive anything, log each post’s link, topic, and performance in a simple spreadsheet so you can look back later. Use UpGrow's analytics dashboard to find the Reels that drive real growth, and archive the rest. After the grid is cleaned up, publish new Reels in the right order so your profile stays organized from top to bottom.
Once you’ve sorted out what to post, the next step is deciding when each Reel should go live. That order matters more than a lot of people think. Each post should help set up the next one.
Think of your Reels tab like a clean sequence, not a random pile of videos. A simple flow works well:
This helps you avoid posting too many similar Reels back to back. It also keeps your content mix balanced, which makes the whole feed feel more intentional.
It also helps to give your main content pillars fixed days each week. Pick 3 to 5 recurring pillars and tie them to set days. Tutorial Tuesday or Feature Friday calendars are easy to follow, and followers start to spot the pattern. Over time, they know what to expect and when to expect it.
After you’ve set those slots, batch-create your Reels using a Reels creation guide and schedule them in that same order. Your calendar doesn’t need to be fancy. A simple setup with publish date, time, topic, and format is enough. The point isn’t just timing. It’s keeping the sequence intact.
Leave one slot open for timely posts so you’re not boxed in if something current comes up. And if you’re running a campaign, tie it to major U.S. shopping or seasonal moments like Black Friday or back-to-school season.
For campaign planning, use a sequence like this:
UpGrow’s analytics dashboard can help you spot which sequence positions get the most engagement. That makes it much easier to compare what’s working and adjust the order without guessing.
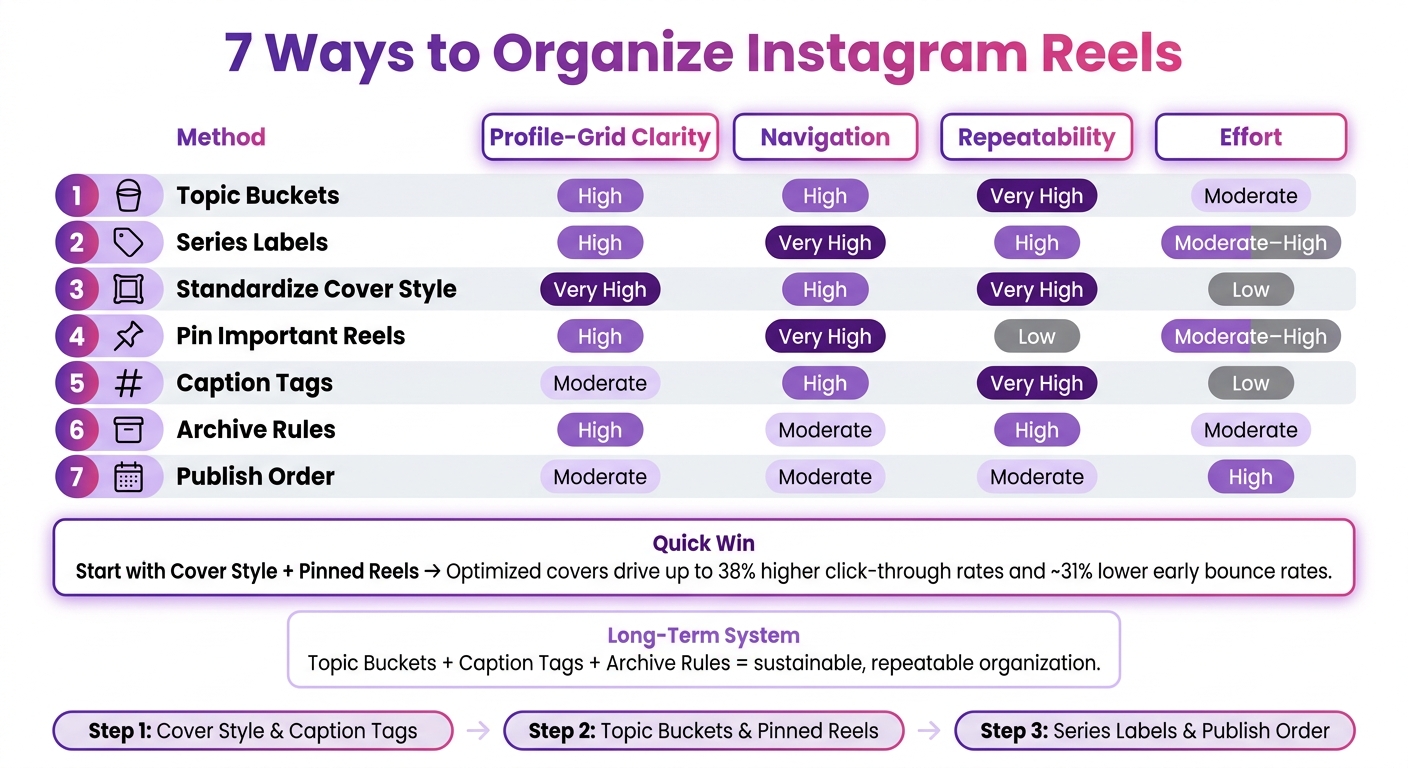
7 Ways to Organize Instagram Reels: Methods Compared
Not every method gives you the same kind of payoff. This quick snapshot helps you see which ones are worth doing first.
| Method | Profile-Grid Clarity | Navigation | Repeatability | Effort |
|---|---|---|---|---|
| 1. Topic Buckets | High | High | Very High | Moderate |
| 2. Series Labels | High | Very High | High | Moderate–High |
| 3. Standardize Cover Style | Very High | High | Very High | Low |
| 4. Pin Important Reels | High | Very High | Low | Moderate–High |
| 5. Caption Tags | Moderate | High | Very High | Low |
| 6. Archive Rules | High | Moderate | High | Moderate |
| 7. Publish Order | Moderate | Moderate | Moderate | High |
If you want fast profile clean-up, start with cover style and pinned Reels. They create the clearest visual change right away. Optimized covers can drive up to 38% higher click-through rates and a nearly 31% lower first-3-second bounce rate.
For long-term structure, topic buckets, caption tags, and archive rules do a lot of the heavy lifting. They’re easy to repeat and don’t take much work once you’ve set the rules.
A simple way to roll this out:
Next, keep the system working with a simple monthly review.
Reels organization only works if you keep up with it.
You can set up your buckets, labels, covers, pins, tags, archive rules, and publish order. But if you never check them again, the whole thing starts to drift. Covers get messy. Pinned Reels stop making sense. Labels shift from one post to the next.
That’s why a simple review rhythm matters.
Weekly (20–30 minutes):
Instagram's built-in Manage menu lets you edit captions and location, pin a Reel to the top of the Reels tab, add it to the profile grid, and archive it.
Use that weekly check to keep the profile tidy. Then use your monthly review to fine-tune the system.
Monthly (60–90 minutes): Review Insights for saves, shares, watch time, and follower growth. Update your topic buckets and series labels based on performance. Archive weak or off-brand Reels. Repurpose strong ideas with a better hook or cover. Use this session to update your social media workflow for the next month so each Reel is tied to the right day, pillar, and series.
If an older Reel picked up strong saves or shares, it may be worth posting again with a better hook and cover.
A weekly check plus a monthly review helps you keep your Reels library in order as it grows.
The best Reels organization system is the one you’ll stick with. That’s what matters most, because each method fixes a different part of the same issue.
Some methods help you sort topics. Others help keep your profile clean. The easiest way to make this work is to start small.
Begin with two or three methods, then add more as your workflow gets easier to manage. Build the habit first. Tweak the system after that.
A simple system you use every time beats a complicated one you use only now and then. Pick what fits your current workflow, use it for every Reel, and grow from there - cohesive Instagram feed, easier planning, repeatable results.
Aim for 5 to 8 categories so your profile stays organized and easy to browse.
You can use up to 10, but going past that can push categories off-screen and make your content harder to navigate.
Archive Reels that no longer match your current branding, offers, or live campaigns. Don’t delete them. Archiving lets you hold on to content you may want to update and use again later.
If a template or piece of content keeps underperforming, it’s often smarter to archive it instead of tweaking it over and over. Your archive can also act as a library for future repurposing.
Pin posts that tell new visitors, fast, what your account is about and why they should care.
Use your three pin slots for:
That mix does three jobs at once. It shows who you are, builds trust, and points people to your main service or the next step.
If someone lands on your profile and only looks at your pinned posts, they should still get the big picture. They should know what your brand does, why they can trust you, and how to get started.


