Ultimate Guide to Instagram Event Menu Campaigns
A 3–4 week playbook to turn Instagram posts into reservations with local targeting, Reels, Stories, and booking-focused content.
A 3–4 week playbook to turn Instagram posts into reservations with local targeting, Reels, Stories, and booking-focused content.
4.98 /5 - from 58k reviews
Trusted by 50,000+ creators — get real engagement delivered to your profile in minutes, not days.
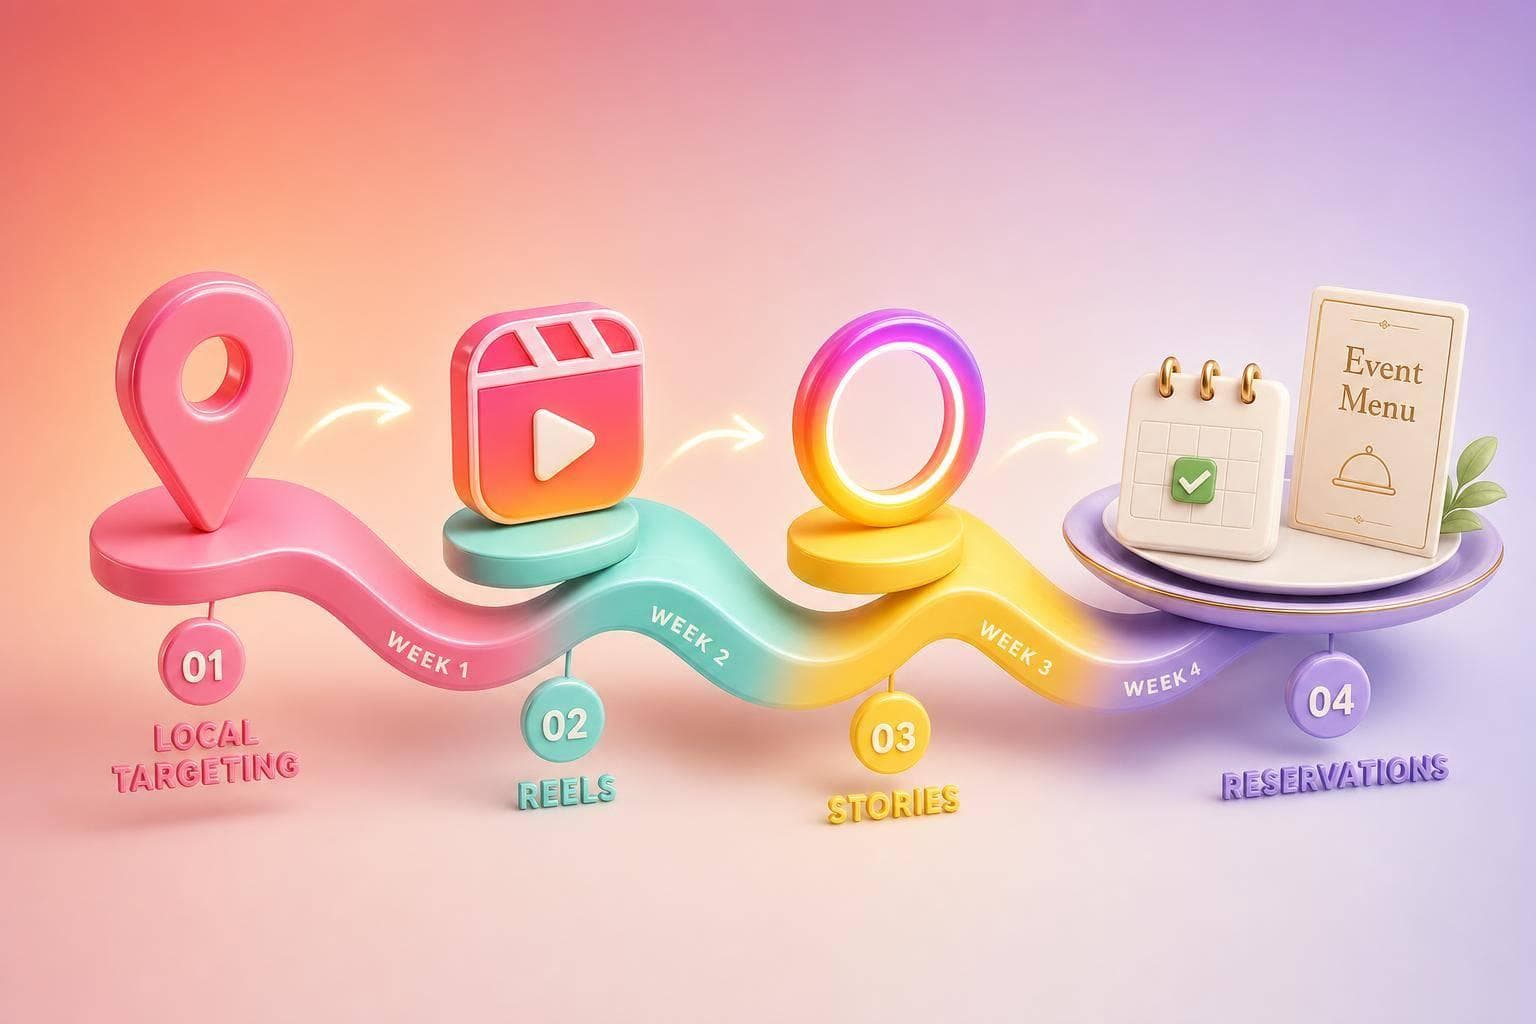
If I want Instagram to fill seats for an event menu, I need one thing above all: a clear path from post to booking. This kind of campaign works best when I keep it short, local, and time-based. The article shows how to do that with a 3- to 4-week plan, a single booking goal, a tight content mix, and post-event reporting tied to sales.
Here’s the whole playbook in plain English:
A few numbers stand out. 54% of people browse social media to decide where to eat, and nearly 68% check a restaurant’s social presence before visiting. That means Instagram can help sell event menus - but only if every post points people toward a seat, a ticket, or a direct inquiry.
| Campaign part | What I focus on |
|---|---|
| Goal | One conversion target only |
| Offer | Clear event details in every post |
| Timeline | Announce, reveal, final push |
| Content | Reels for reach, Stories for action, Carousels for menu saves |
| Local reach | Geotags, short hashtag set, nearby targeting |
| Engagement | Fast DM and comment replies |
| Results | Bookings over vanity metrics |
If I keep the campaign simple, local, and booking-focused, Instagram stops being just a posting channel and starts working like a sales tool for the event.
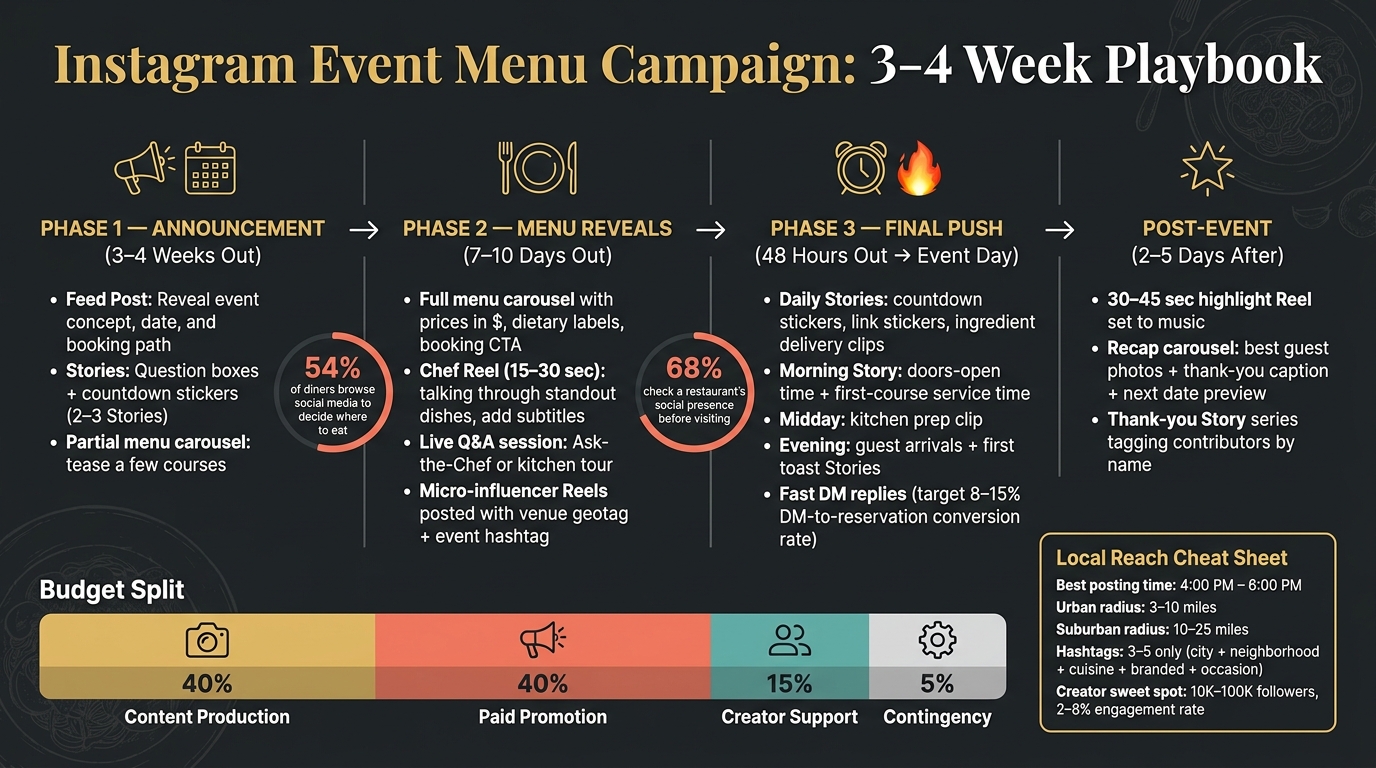
Instagram Event Menu Campaign: 3–4 Week Content Timeline
Pick one primary conversion before you publish anything. For an event menu campaign, that usually means choosing a single target: reservations, ticket sales, preorder packages, or DM inquiries. If a restaurant is running a prix fixe tasting, the goal might be 40 reservations at $75 per person. That gives you a clear finish line. At the end of the campaign, you’ll know if it worked or not.
After that, set the budget across four buckets: content production, paid promotion, staff time, and creator partnerships if you’re using them. A simple starting split looks like this:
If your team can shoot content in-house, put more of the budget into boosted posts. If the menu has a lot of visual detail, spend on professional food styling first. That often makes the sales posts work harder.
A 3- to 4-week rollout gives each post a clear role instead of asking every post to do everything at once. Use this three-phase timeline:
| Phase | Timing | What to do |
|---|---|---|
| Announcement | 3–4 weeks before | Reveal the event concept, date, and booking path |
| Menu reveals | 7–10 days before | Share pricing, course highlights, and scarcity cues |
| Final push | 48 hours before | Urgency reminders, last-seat alerts, direct booking link |
Use one offer across every post. Your booking message should answer the questions a diner needs before they commit: date and time, price per person, menu highlights, dietary swaps, seat count, booking method, and cancellation terms. It also needs to say, plainly, whether the event is dine-in, pickup, or ticketed.
For example: Friday, September 12 at 7:00 PM, a 5-course coastal tasting menu, $85 per guest, vegetarian swaps available with 48-hour notice, 24 seats only, reserve via the link in bio, nonrefundable within 72 hours.
That single block of copy cuts friction. A reader can scan it and decide fast: Is the price right? Does the format fit? Am I ready to book? Lead with the key detail, keep the language plain, and give people a reason to act now.
Once the offer is locked in, narrow your reach so nearby diners see it first. A realistic targeting radius is 3 to 10 miles in dense urban areas and 10 to 25 miles in suburban or car-dependent markets. Go broader only when the event gives people a strong reason to travel, like a chef collaboration or a limited-seating tasting menu.
UpGrow helps with local campaigns through AI targeting and location filters aimed at nearby diners. Its profile optimization tools can also help you get the basics right before launch, like your account bio, booking link, and event Highlights, so profile visits are more likely to turn into bookings.
Once the offer is set, tie every post to a clear campaign phase. A single event menu can fuel weeks of Instagram content when you build around a few simple pillars: the food, the process, the people behind it, and the booking details guests need before they commit. The goal is simple: each post should help move someone a little closer to reserving.
Menu close-ups should spotlight hero dishes, signature cocktails, and desserts in natural light. Keep captions short, and include pricing. Chef and kitchen prep content fits best in short Reels or Stories, like a 15–30 second clip of a pan flaming or pasta being hand-rolled. That kind of post shows skill and helps people feel more comfortable booking. Ingredient sourcing posts can also do a lot of work, especially when they feature a local farm or supplier. They help reinforce freshness and regional sourcing.
Plating and room setup content helps people picture the night before they reserve. A time-lapse of bare tables turning candlelit does that fast. Guest reaction content matters too. UGC-style clips of guests clinking glasses or reacting to courses add social proof, as long as you have permission to repost them.
Utility content deserves just as much attention. A simple carousel or Story can explain parking, arrival time, dress code, ADA access, and how to reserve. Save those details in a Highlight called Event Info so guests can check them later without digging.
Use the timeline so each format has one clear job.
In Weeks 1–2 (pre-event awareness and consideration), start with a teaser feed post built around a plated dish and the event date. Follow that with 2–3 Stories using question boxes and countdown stickers. Around the middle of the week, post a partial menu carousel that reveals a few courses and hints that more is coming. In week two, publish the full menu carousel with prices in $, dietary labels, and a clear booking CTA. Pair it with a Reel of the chef talking through the standout dishes, and add subtitles for accessibility.
In Week 3 / event week (countdown and booking push), switch to daily Stories with countdown stickers, link stickers, and short clips of ingredient deliveries or test plating. On the day of the event, post a morning Story with the doors-open time and first-course service time, a midday kitchen prep clip, and a few evening Stories that show guest arrivals and the first toast.
In the post-event window (2–5 days after), share a 30–45 second highlight Reel set to music. Then post a recap carousel with the best guest photos, a thank-you caption, and a preview of the next date if it has already been confirmed.
Each Instagram format does a different job in an event menu campaign.
| Format | Best use case | Strengths | Limitations | Ideal timing |
|---|---|---|---|---|
| Reels | Chef prep, room setup, event highlights | Strong local discovery reach; works with location tags | Needs editing time; not ideal for detailed logistics | 1–2 in the pre-event period; 1 on event day or the next day |
| Stories | Countdowns, link stickers, reminders, quick FAQs | Low-pressure and interactive; great for behind-the-scenes content; can be saved as Highlights | Limited reach beyond current followers; disappears after 24 hours unless saved | Daily in the final 7–10 days; high frequency on event day |
| Feed posts / Carousels | Menu reveals, key announcements, recap posts | Persistent; carousels can hold up to 20 slides for a full course progression | Lower posting frequency helps avoid fatigue | Teaser, partial reveal, full menu, and post-event recap |
| Live | Ask-the-Chef Q&A or a short pre-event kitchen tour | Real-time interaction; Q&A helps build trust; can be saved afterward | Needs a stable connection and prep; some guests may not want to be filmed | 1 session in the week before the event |
Batch-shooting helps keep this manageable. In one session, aim for 10–15 photos and 5–7 short clips, then sort them by menu, prep, room setup, and logistics.
Once the menu and content are set, the next move is distribution. Then, as the event gets close, the focus shifts again: from getting seen to getting people in the door.
Tag your venue’s exact location on every event post, Reel, and Story. That small step helps your content show up in local discovery feeds and nearby suggestions, which puts you in front of people who don’t follow you yet.
Hashtags matter too, but don’t overdo them. Stick with 3 to 5 hashtags:
This gives the post enough local context without making it look stuffed.
Posting time matters just as much as tagging. Share dinner-focused content between 4:00 p.m. and 6:00 p.m. in your venue’s time zone, when people are deciding where to eat. In the caption, tie the event to the season or occasion so the post feels timely and urgent.
If you want to get past your current follower base, work with local creators and nearby partners. Micro-influencers with 10,000 to 100,000 followers tend to work best when their audience is local and their engagement rate falls between 2% and 8%.
The formats that make the most sense are simple:
Cross-promotions can help too. A local winery, bakery, or craft brewery gives both brands a reason to post, and it puts your event in front of people who already care about going out nearby.
The key is to keep all of that content tied to one goal: turn local attention into bookings. When you brief a creator, give them the event date, menu highlights, and a short shot list of hero dishes. Then step back a bit and let them speak in their own style.
During the campaign window, fast replies matter. Think of your inbox like a reservation desk. If someone asks about availability, allergies, pricing, or parking, that’s not random chatter. It often means they’re close to booking.
Have prewritten replies ready for common allergy questions, especially around gluten-free, dairy-free, and nut-free options. Invite guests to add those needs when they reserve. For pricing, keep it plain: share the per-person cost, what’s included, and whether tax and gratuity are separate. For parking, be specific. Point people to the nearest validated garage, explain local street parking norms, and tell them when to arrive.
Use one branded event hashtag on table cards and menus so guests know exactly what to use. On event night, watch location tags and mentions as they come in. Repost strong guest Stories in real time to help drive last-minute reservations. After the event, post a short thank-you Story series with guest photos and tag contributors by name. That extra follow-up keeps the event visible a little longer and nudges more attendees to share their own posts.
After the event, move from promotion to reporting. Start with bookings. Likes and follower counts come after that.
Why? Because likes and follower counts are vanity metrics. The numbers that matter most sit across four stages: awareness, consideration, intent, and conversion.
| Instagram Metric | What It Reveals |
|---|---|
| Reservations / Ticket Sales | The actual business outcome that validates everything else |
| Link Taps & DM Inquiries | Strong booking intent - closer to conversion than likes |
| Saves | Interest in revisiting the date, menu, or price |
| Shares | Social relevance; people forwarding the event to friends |
| Comments | Engagement depth and event-specific questions |
| Profile Visits | Curiosity about the event or menu details |
| Reach & Impressions | How many people saw your event content |
| Follower Growth | Whether the campaign built a lasting local audience |
High saves and DMs mean more than broad reach without bookings. A save often means someone plans to come back and check the details again - the date, the price, or the menu. DMs are an even stronger signal. If your workflow sends booking links through DM after someone comments or uses a keyword, a healthy DM-to-reservation conversion rate is 8–15%.
If most bookings come in by phone or walk-in, ask one simple intake question so you can track where people heard about the event. Instagram data on its own won't show the full picture.
Judge each format by the job it was supposed to do. After the event, look at results format by format, then match each one to the KPI it was meant to drive: Reels for reach and shares, Carousels for saves and return visits, and Stories for link taps and replies instead of views alone. If you used Live, check the booking-related actions and questions it produced.
Timing matters too. Look for spikes in engagement right after publishing or during a reminder sequence. That can show which posting times or follow-up reminders pulled the most weight.
Then break results down by audience segment. Compare performance by location, follower status, age range, gender, and language when that data is available. For a local event menu campaign, the group that matters most is usually nearby users who keep engaging - profile visits, saves, and link taps across more than one post. If one neighborhood or age group keeps saving your menu post more than others, that's a strong clue about where to put your next paid boost or creator partnership.
Use UpGrow's live dashboard to monitor audience quality and local traction in real time.
Use these results to shape the next offer, budget, and posting mix. Change only what the data proves. Go into the next campaign with a clear event offer, a phased content calendar, and one main conversion KPI - whether that's reservation button clicks, ticket sales, or preorder volume. Keep what worked, cut what didn't, and roll those wins into the next launch.
For major events, start early and split your campaign into clear branded phases: teaser, live announcement, and final recap.
The idea is simple: show the whole journey, from the early planning stages to the big moment. That helps build buzz and gives people a reason to stay tuned instead of dropping off halfway through.
You can also use Instagram Highlights to save each phase, so the event stays visible on your profile and people can catch up at any point.
Include the key event details up front, add a clear call to action, and make the registration deadline feel time-sensitive. In Stories, use countdown stickers and link stickers so people can sign up right away.
To get more interaction, mix in polls or quizzes, post behind-the-scenes content, and add location tags. If it fits, UpGrow can help extend your reach with AI-targeting aimed at a local audience that’s more likely to book.
Focus on engagement and conversion metrics: follower growth, reach, total interactions (likes, comments, shares, saves), and engagement rate by reach (ERR).
For Reels and Stories, track watch time, completion rate, taps back, taps forward, and exits. If you use external links, measure click-through rate (CTR) and profile link taps. UpGrow’s real-time dashboard helps you monitor these by audience demographics and local performance.