Multi-Account Instagram Scheduler: Guide 2026
Manage multiple Instagram accounts with one scheduler, clear roles, and weekly reviews; choose native, Meta Business Suite, or third‑party tools.
Manage multiple Instagram accounts with one scheduler, clear roles, and weekly reviews; choose native, Meta Business Suite, or third‑party tools.
4.98 /5 - from 58k reviews
Trusted by 50,000+ creators — get real engagement delivered to your profile in minutes, not days.

If you run more than one Instagram account, the fix is simple: use one scheduling system, set clear roles, and review results every week. That cuts wrong-account posts, missed approvals, and messy reporting.
Here’s the short version:
A few rules matter more than anything else: don’t share passwords, test each account before publishing at scale, and keep naming clear so posts don’t land on the wrong profile.
| Option | Best for | Main limit | Main use |
|---|---|---|---|
| Native Instagram | Solo users | No approval flow | Simple scheduling |
| Meta Business Suite | Small brand teams | Limited review process | Shared Meta workflow |
| Third-party scheduler | Agencies and larger teams | Cost depends on plan | Multi-account control and reporting |
If you want a setup that stays organized as account count grows, I’d keep the stack simple: one dashboard, role-based access, a shared calendar, and one weekly review habit.
Pick your setup based on three things: how many accounts you manage, how many people touch the work, and how much reporting you need.
The native Instagram app is the easiest place to start. Setup is light, and it works well for one person managing a small batch of accounts. Instagram supports up to 5 accounts per device for fast switching.
That said, it's pretty bare-bones. There’s no approval flow, no shared dashboard across accounts, and bulk scheduling is limited. If someone else needs to check posts before they go live, this setup usually starts to feel too small.
Meta Business Suite is free and makes sense for brands already working inside the Meta ecosystem. You get a shared calendar, inbox, and analytics in one place.
It also supports unlimited accounts through permissions, which means teams can give access to multiple people without handing around login details. The trade-off is simple: access sharing is there, but a formal approval chain isn’t. So if your team needs a clean draft → review → approve process, Meta Business Suite may not go far enough.
Third-party schedulers make sense when native tools stop keeping up. If you’re handling more accounts, need approvals, or want deeper reporting, this is usually the next step.
These tools connect to Instagram through official API access and add features the native options don’t offer, like approvals, visual calendars, and cross-platform planning.
Here’s the side-by-side view:
| Feature | Native App | Meta Business Suite | Third-Party Scheduler |
|---|---|---|---|
| Account limit | 5 per device | Unlimited (via permissions) | Tier-based by account volume |
| Approval workflow | None | Basic shared access | Multi-role tiers |
| Content support | Instagram only | Instagram + Facebook | Multi-platform |
| Analytics | Basic, per account | Full Meta Insights | Unified cross-account reports |
| Best for | Solo creators | Small brands in Meta ecosystem | Agencies and larger teams |
For sensitive accounts, keep them on separate devices or fixed IPs to cut linked-account risk.
Once you choose a setup, the next step is permissions and workspace structure.
Before you connect even one account to a scheduler, set up access the right way. That step helps stop wrong-account posts, missed approvals, and the messy habit of sharing passwords. Skip it, and things can go sideways fast.
Every Instagram account you want to schedule through a third-party tool needs Professional status, either Business or Creator. That’s what allows API publishing and cross-account analytics.
Next, confirm publishing access inside your scheduler. Check that the right Facebook Pages and assets are linked. Then publish one test draft to the correct account before anything goes live. It’s a small step, but it can save you from a very public mistake.
Use named roles instead of shared passwords. Each person should log in with their own account and get only the access they need.
| Role | Typical responsibility | Should publish? | Should approve? | Should edit settings? |
|---|---|---|---|---|
| Owner | Owns the account and assets | Yes | Yes | Yes |
| Admin | Manages access and settings | Yes | Yes | Yes |
| Content Creator | Drafts content | No | No | No |
| Publisher / Community Manager | Schedules and publishes approved posts | Yes | Sometimes | No |
| Approver | Reviews and approves content | No | Yes | No |
Assign one clear approver per account or client. That keeps reviews moving and cuts down on conflicting edits.
Set a naming rule for every account in the dashboard. Formats like ClientName_IG_Main or BrandRegion_IG_Campaign make it easy to spot the right profile at a glance. If your tool has folders or color labels, use them to separate client accounts from internal brand accounts.
A clean setup usually comes down to three simple rules:
Also, use a password manager and keep a written access inventory for each account. Track who owns it, who can publish, and who can approve only.
Note: Frequent manual switching can trigger security checks. A centralized dashboard removes the need for that kind of frequent manual switching entirely.
Once roles and access are locked in, you can build your calendar, queue, and approval flow on top of them.
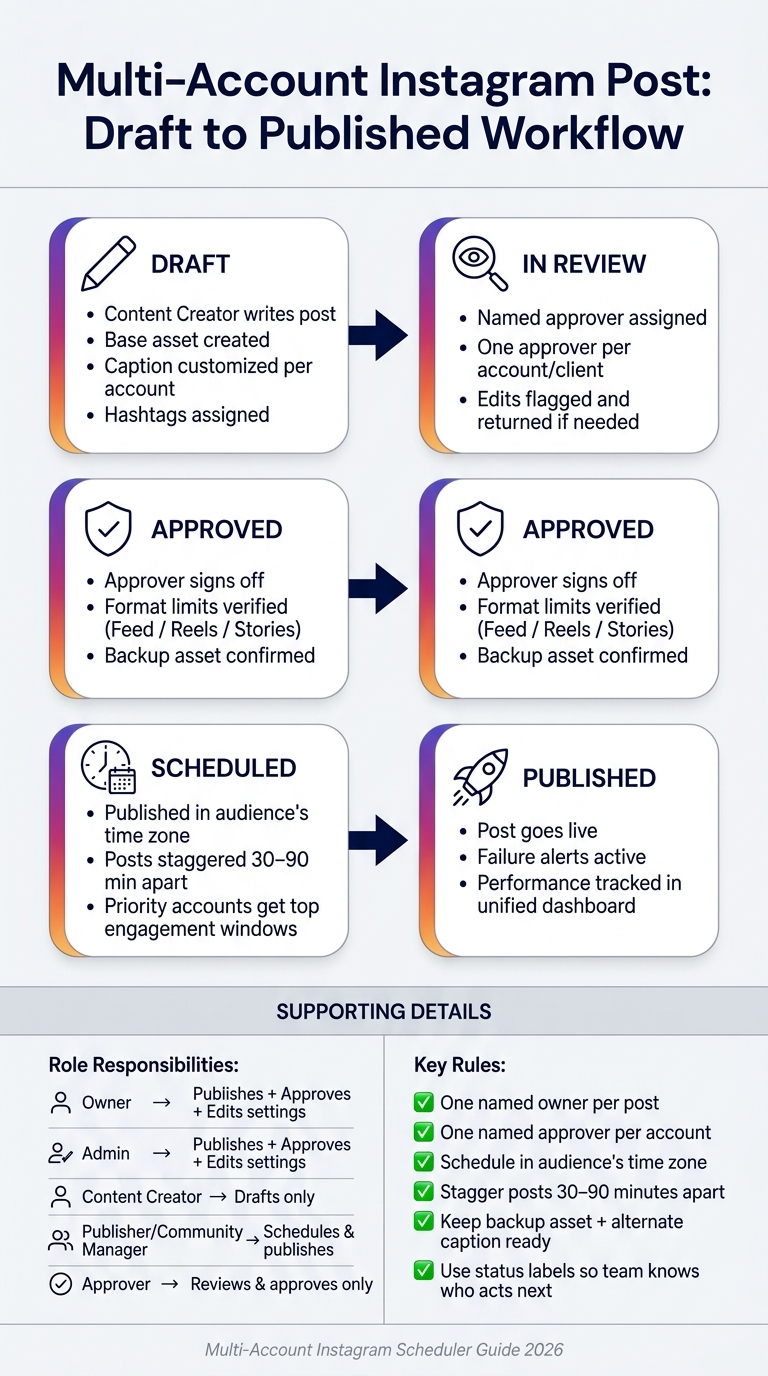
Multi-Account Instagram Scheduling Workflow: From Draft to Published
Once permissions are set, turn them into a day-to-day publishing system. The goal is simple: build one workflow your team can repeat without chaos.
Use one master calendar with one row per brand and one column per day. That gives each account its own posting rhythm while keeping campaigns lined up across the board. Tag every post to a campaign goal, like a product launch, a promotion, or evergreen education. That way, the calendar shows more than timing. It shows purpose.
Publish time matters more than many teams think. Schedule each account in the time zone of its main audience. If an account serves West Coast customers, publish in Pacific Time even if your team works in Eastern Time. For brands with national reach, add a reference column with converted publish times across Eastern, Central, Mountain, and Pacific. It sounds simple, but it can save you from posting at the wrong local hour, especially when daylight saving time shifts things around.
If you manage 5–10 accounts, batch content capture on one day, then handle edits and caption changes on the next. That keeps production efficient without making every profile feel cloned.
Start with one base asset, then customize everything around it for each account. A few small changes go a long way:
A national retail brand might use the same product photo across regional accounts but mention local store details or local promotions in each caption. The image stays the same. The message feels more personal.
Stagger related posts by 30–90 minutes. Give your top engagement windows to priority accounts, then move support accounts into nearby slots.
Every post in the queue should have a named owner and a named approver. Use a clear status path - draft → in review → approved → scheduled → published - so everyone knows where a post stands and who needs to act if something gets stuck. Add failure alerts, a backup asset folder, and a preapproved alternate caption. If one post fails, the whole network doesn’t have to grind to a halt.
That setup leads straight into posting rules and analytics review in the next section.
Once your queue is ready, check what each format and publishing method can handle before anything goes live.
Review per-account limits before scheduling. Native publishing, API-based tools, and content formats all come with their own caps and scheduling windows.
A few format rules tend to trip teams up:
Use separate checklists for Feed, Reels, and Stories. It sounds simple, but it saves a lot of last-minute scrambling.
Once the posting limits are clear, let performance data tell you what earns another spot on the calendar.
Use one dashboard across all accounts, then drill down by profile or campaign when you need detail. The three reporting layers that matter most are:
| Reporting View | Primary Focus | Typical Metrics | Best Use Case |
|---|---|---|---|
| Account-level | One profile's performance | Reach, impressions, likes, comments, saves, engagement rate, follower growth, profile visits, link clicks, posts per week | Diagnosing underperformance, adjusting cadence per account |
| Campaign-level | A specific campaign across posts and accounts | Campaign reach, total engagements, saves, engagement rate, clicks, conversions if tracked, posts per campaign, format breakdown | Measuring launches and promotions, comparing creative themes |
| Cross-account summary | All managed accounts together | Total reach, total engagements, average engagement rate, total follower net change, total posts published, distribution of formats | Spotting top and lagging profiles, balancing workload across the portfolio |
For weekly reviews, pull 7-day data for all accounts and compare it with the prior 4–8 weeks. Then adjust cadence, creative, or hashtags based on what the numbers say. If an account is clogged with low-priority posts, cut some, combine similar announcements, or move part of that content into Stories instead of the feed.
Saves deserve close attention. They often show that a post was useful enough for someone to come back to later, especially when you're publishing educational or evergreen content.
Use those weekly numbers to decide what stays, what goes, and what gets more room on the calendar.
Pick the scheduler that fits your posting volume, publish within platform rules, and review results every week. Scheduling helps with growth, but it doesn't do the whole job on its own. If your team wants a clean publishing system and audience growth, UpGrow handles the growth side - AI-powered targeting, profile optimization, and real-follower acquisition - so your scheduled content gets in front of the right people.
Start by switching your accounts to Business or Creator profiles. That gives you access to the official Instagram Graph API, which is the approved way to schedule posts securely and stay within Instagram’s rules.
Next, connect each Instagram account to a Facebook Business Page. This step opens up the full set of account management features, so it’s not something you want to skip.
When you pick a tool, focus on a few must-have features:
That setup makes it much easier to handle multiple accounts without sharing passwords or bouncing between devices.
With a Professional account - Business or Creator - you can auto-publish most standard Instagram content through an official API-connected tool like UpGrow. That includes Reels, Stories, and regular posts.
There’s one catch: content with interactive elements still needs manual posting, or at least a final step inside the Instagram app. This includes:
So if your post is plain and straightforward, you can usually set it and move on. If it includes interactive features, you’ll need to finish the job in Instagram itself.
Match your review cadence to your goals: monthly for general updates, weekly for fast-moving launches, and quarterly for long-term strategy.
Instagram metrics often need 48 to 72 hours to settle. That’s why weekly reviews tend to be more useful than daily check-ins. Daily swings can be noisy. A week gives you a cleaner read on what’s happening.
If you manage more than one profile, a real-time dashboard like UpGrow’s can help you track engagement and growth trends across multiple accounts.