
Instagram Scheduling with IFTTT: 7 Steps
7-step workflow to schedule Instagram posts with IFTTT — covers account setup, triggers, field mapping, approval, testing, and tracking.
7-step workflow to schedule Instagram posts with IFTTT — covers account setup, triggers, field mapping, approval, testing, and tracking.
4.98 /5 - from 58k reviews
Trusted by 50,000+ creators — get real engagement delivered to your profile in minutes, not days.

You can set up Instagram scheduling with IFTTT in 7 clear steps: connect the right account, pick a trigger, map your fields, set date and time rules, add approval, test 3–5 sample posts, and track results 24–48 hours later.
I’d keep one thing in mind from the start: this only works with an Instagram Business or Creator account, not a personal one. I’d also make sure my dates use MM/DD/YYYY, my times use hh:mm AM/PM, and my time zone matches across every tool. Most posting errors come from three things: wrong account access, bad media links, or time zone mismatches.
Here’s the whole process in plain English:
What matters most: I’d use one master sheet, one active applet, and a simple log for tests and post results. That cuts down on duplicate posts, missed approvals, and timing mistakes.
The article below walks through that system in order, with short checklists for setup, testing, and tracking.
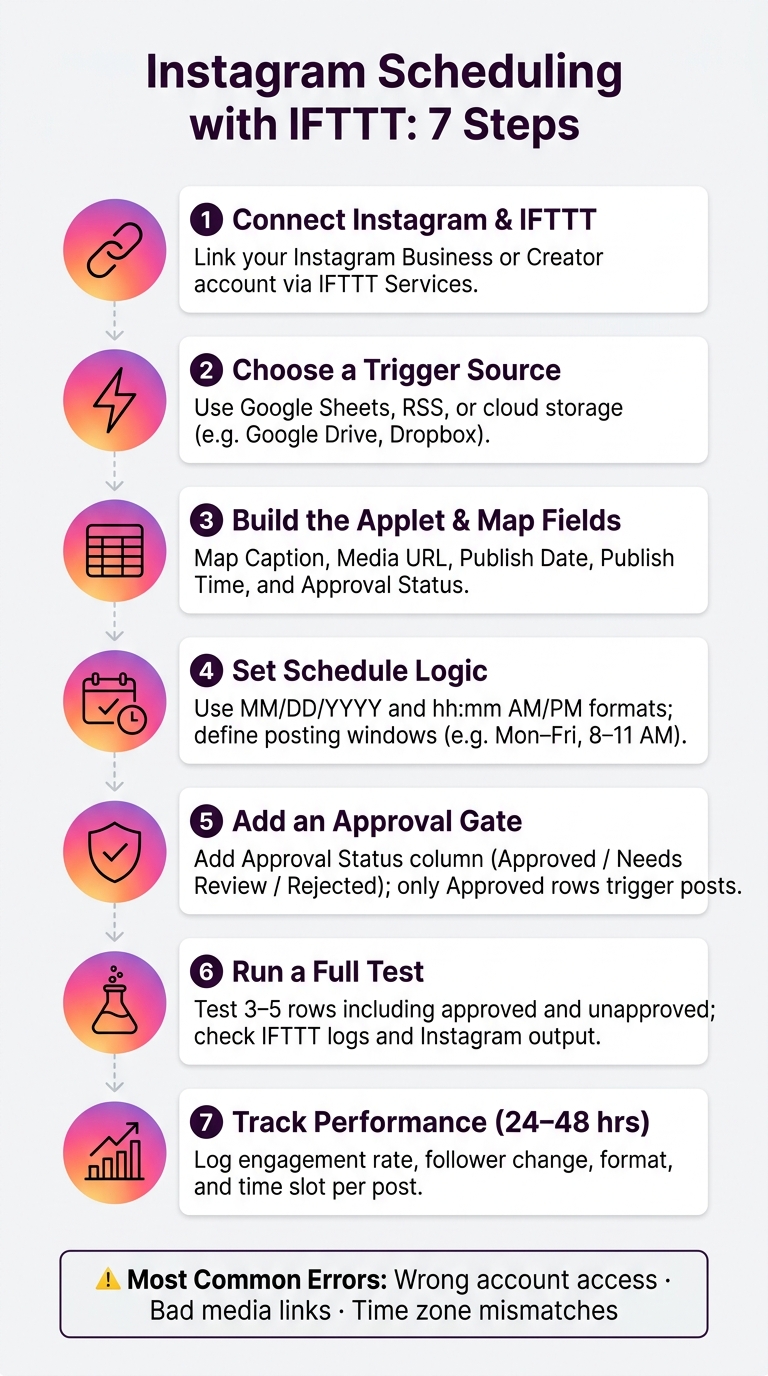
Instagram Scheduling with IFTTT: 7-Step Workflow
Follow these steps in order. Each one builds on the last. If you jump ahead, small setup mistakes can turn into messy problems later.
Sign in to IFTTT, open Services, and search for the Instagram service or the Meta/Instagram Business integration. When IFTTT asks, log in with the Meta account tied to your Instagram Business or Creator profile and allow the permissions needed for publishing, media access, and profile info.
Before you move on, double-check that the connected profile is the exact Business or Creator account you want to post from. It sounds obvious, but this is one of those small details that can trip people up fast.
Pick the source that already stores your queued posts: Google Sheets, RSS, or cloud storage.
For most teams, Google Sheets is the easiest place to start because each new row can trigger an Applet. RSS makes sense if you're turning blog posts into Instagram content. Cloud storage options like Google Drive or Dropbox work well when a new image file added to a folder should start the process.
No matter which source you use, include at least these five fields:
Once you've picked the source, the next move is to map those fields inside the Applet.
In IFTTT's Create flow, choose If This and select your trigger service - Google Sheets, RSS, or cloud storage. Then set the event that should start the workflow.
Under Then That, pick the action you want and map the fields the right way: Caption goes to post text, Media URL goes to media, and Publish Date/Time goes to the scheduled record.
One thing matters here: the media file has to be publicly accessible and in a format Instagram accepts, such as JPEG, PNG, or MP4.
Use MM/DD/YYYY and hh:mm AM/PM everywhere. That means your Google Sheet, your scheduling rules, and the rest of the workflow should all match.
Next, define your posting window. For example, you might allow posts only Monday through Friday, from 8:00 AM to 11:00 AM local time. Then add a formula or filter in Sheets that marks a row as eligible only when it falls inside that window.
Use the same MM/DD/YYYY format and the same local time zone in Sheets, IFTTT, and Instagram. If one tool reads time differently, your schedule can drift without much warning.
Add an Approval Status column to your Google Sheet with values like Approved, Needs Review, or Rejected. Then set up your Applet so it acts only on rows marked Approved. You can do that by listening only to an "Approved" tab or by using a filter that checks the column value before the Instagram action runs.
If more than one person reviews content, add a Reviewer column and an Approval Date column too. That gives you a simple audit trail that shows who approved each post and when they did it.
Once the approval gate is set, run a full test before anything goes live. Create 3–5 test rows, including one approved row and one unapproved row, so you can make sure the gate does its job.
After you enable the Applet, check IFTTT's activity logs. Look for whether triggers fired, actions went through, or errors showed up. Then check Instagram and confirm that approved test posts have the right caption, image, and timestamp in your local time zone.
Also test a few edge cases:
Write down every issue in a simple log, then fix it before the workflow goes live. A short testing pass now can save a lot of cleanup later.
After the workflow is live, track what each scheduled post actually delivers. Log each post's date, time, format, engagement, reach, and follower change 24–48 hours after publishing.
That way, you're not just posting on schedule. You're building a record that shows which content types and posting windows are pulling their weight.
Use these templates to keep approval, testing, and tracking consistent for Steps 5–7.
Run through this before any post is marked Approved in your source file.
| Check Item | What to Verify | Status (✓ / ✗) |
|---|---|---|
| Caption Accuracy | No spelling, grammar, date, or price errors | |
| Brand Voice | Tone matches your brand; CTA is clear and on-message | |
| Hashtags | Tags are spelled correctly, not banned, and fit the post | |
| Mentions | Any @mentions are correct and there on purpose | |
| Image/Video Format | File meets Instagram image specs, including the right aspect ratio and resolution | |
| Scheduled Date & Time | Date is MM/DD/YYYY; time is hh:mm AM/PM in your U.S. time zone | |
| Approval Status | Row is marked "Approved" in the source file |
Use this table each time you create, update, or troubleshoot your IFTTT applet.
The idea is simple: log every test run in its own row. That way, if something breaks, you can look back and see what changed, when it changed, and what fixed it.
| Trigger Source | Test Case | Date/Time (MM/DD/YYYY, hh:mm AM/PM) | Expected Result | Observed Result | Error Notes | Fix Applied |
|---|---|---|---|---|---|---|
| Google Sheets – Scheduled Posts | Single photo post with standard caption and 5 hashtags | 08/05/2026, 02:30 PM | Post publishes to Instagram within 5–10 minutes, caption fully visible, correct image, all hashtags present | Post published at 02:42 PM with full caption and correct image; all hashtags present | None | No fix needed - baseline test passed |
Once the workflow passes testing, use this table to track live post results.
Fill it in 24–48 hours after publishing. That window gives Instagram enough time to show how the post is actually doing, instead of giving you a too-early read.
| Publish Date (MM/DD/YYYY) | Time Slot | Content Pillar | Post Format | Engagement Rate (%) | Follower Change | Notes | Next Action |
|---|---|---|---|---|---|---|---|
| 08/03/2026 | Morning (8–10 AM) | Behind the Scenes | Story | 2.1% | +2 | High DM activity | Use Poll sticker |
| 08/05/2026 | Afternoon (12–2 PM) | Promotion | Photo | 1.8% | -1 | Low reach | Test new hashtags |
| 08/05/2026 | Morning (8–10 AM) | Education | Carousel | 4.3% | +18 | Strong saves; niche hashtag set used | Repeat format weekly |
Pull Engagement Rate and Follower Change from UpGrow's live dashboard.
When you spot a time slot or content pillar that keeps doing well, note that pattern in the Notes and Next Action columns. That's where this table starts to pay off. You're not just tracking posts - you're building a smarter posting schedule based on what your audience responds to.[/section]
Once your workflow is live, use this checklist to catch the issues that lead to missed posts or duplicate posts. These are the problems most likely to throw the whole setup off.
A bad account connection is one of the most common reasons an applet stops working. This often happens after a password change or a security review. To fix it, open IFTTT’s My services panel and make sure Instagram and any trigger services show as active. If you spot an old connection, remove it, then reconnect the correct Business or Creator account with admin-level Page access.
Formatting problems can also cause posts to fail. If the media URL is blank, expired, or points to a file type Instagram won’t accept, publishing may break. Each row in your scheduling sheet should include a valid HTTPS link to a stable file like .jpg, .png, or .mp4. It also helps to use data validation so blank media fields get blocked before they ever reach IFTTT.
Time zone mismatches are another easy way to end up with posts going out at the wrong time. If IFTTT’s time zone doesn’t match your content calendar, a post can publish at the wrong local hour. Set both IFTTT and your content calendar to the same U.S. time zone.
Overposting usually happens when duplicate applets or old applets are still turned on. Audit your IFTTT applets on a regular basis, and disable or delete any old ones you no longer use. Stick with one master sheet and one active applet.
A simple safeguard is to set a daily posting cap in your scheduling sheet and use conditional formatting to flag any day that goes over that limit before it reaches approval. Skipped approvals matter just as much. If a post goes live without Approved status, pause the applet, restore the filter so only Approved items can publish, and log the issue before turning the applet back on.
Recheck these controls any time you update the sheet or the applet.
After testing and tracking, the workflow starts to feel less like a loose set of tasks and more like a system you can trust. Each part supports the others: account connections, triggers, field mapping, scheduling, approval, testing, and tracking. Skip one, and the whole setup gets weaker.
Start small. Run one or two posts per week for a month, log what happens, and scale only after the workflow shows it's stable. UpGrow can help you track audience quality and growth with real-time analytics and a live dashboard.
The goal is reliable automation that you can review, adjust, and improve.
No. A personal Instagram account doesn’t have the API access needed for automated scheduling with IFTTT.
If you want automated scheduling, switch to a Business or Creator account and connect it to a Facebook Business Page.
A personal account may still work for notification-based manual posting. But it can’t do true auto-publishing.
First, make sure your Instagram account is set to Professional - either Business or Creator - and linked to the correct Facebook Page.
Then review your automation logs for silent failures. Also check whether your access tokens have expired, which usually happens every 60 days.
If you spot an action block or repeated errors, pause automation and move to manual posting for 48 to 72 hours while you review permissions and connection settings.
Use one clear status path for every post: draft, in review, approved, scheduled, and published. That gives everyone the same playbook and cuts down on last-minute chaos. It also helps people see, at a glance, what still needs work and what’s ready to go.
Set one owner and one approver for each account. That simple rule avoids mix-ups, duplicate edits, and the classic “I thought someone else had it” problem.
Check automation logs on a regular basis for stuck posts. If something fails quietly, it can sit there until publish time sneaks up on you. Use comments or publisher notes to confirm final requirements, especially when details change late in the process.
Before anything goes live, test on a secondary account. It’s a simple safety check that helps you confirm triggers and approvals are working the way they should.


