
10 prompts for AI UGC photos that look human
Real UGC fails when it's too polished — use prompts that preserve phone light, skin texture, lived-in backgrounds, and casual framing.
Real UGC fails when it's too polished — use prompts that preserve phone light, skin texture, lived-in backgrounds, and casual framing.
4.98 /5 - from 58k reviews
Trusted by 50,000+ creators — get real engagement delivered to your profile in minutes, not days.

Most AI UGC photos fail for one reason: they look too polished. If you want a photo to feel like a normal phone shot, I’d focus on 4 things first: light, skin, background, and framing.
In this article, I break down 10 prompt ideas that help AI keep the photo casual instead of turning it into a glossy ad. The main fix is simple: tell the model what to keep, not just what to change. That means wording like “shot on a phone,” “natural window light,” “keep skin texture,” and “slight noise”.
Here’s the core takeaway in plain English:
That matters because people judge images fast. Studies on first impressions often show people form opinions in milliseconds, and over-smoothed photos can look off at a glance. In practice, even small prompt changes and Instagram growth hacks can make a big difference in whether an image feels like a post from a person or a staged brand shoot.
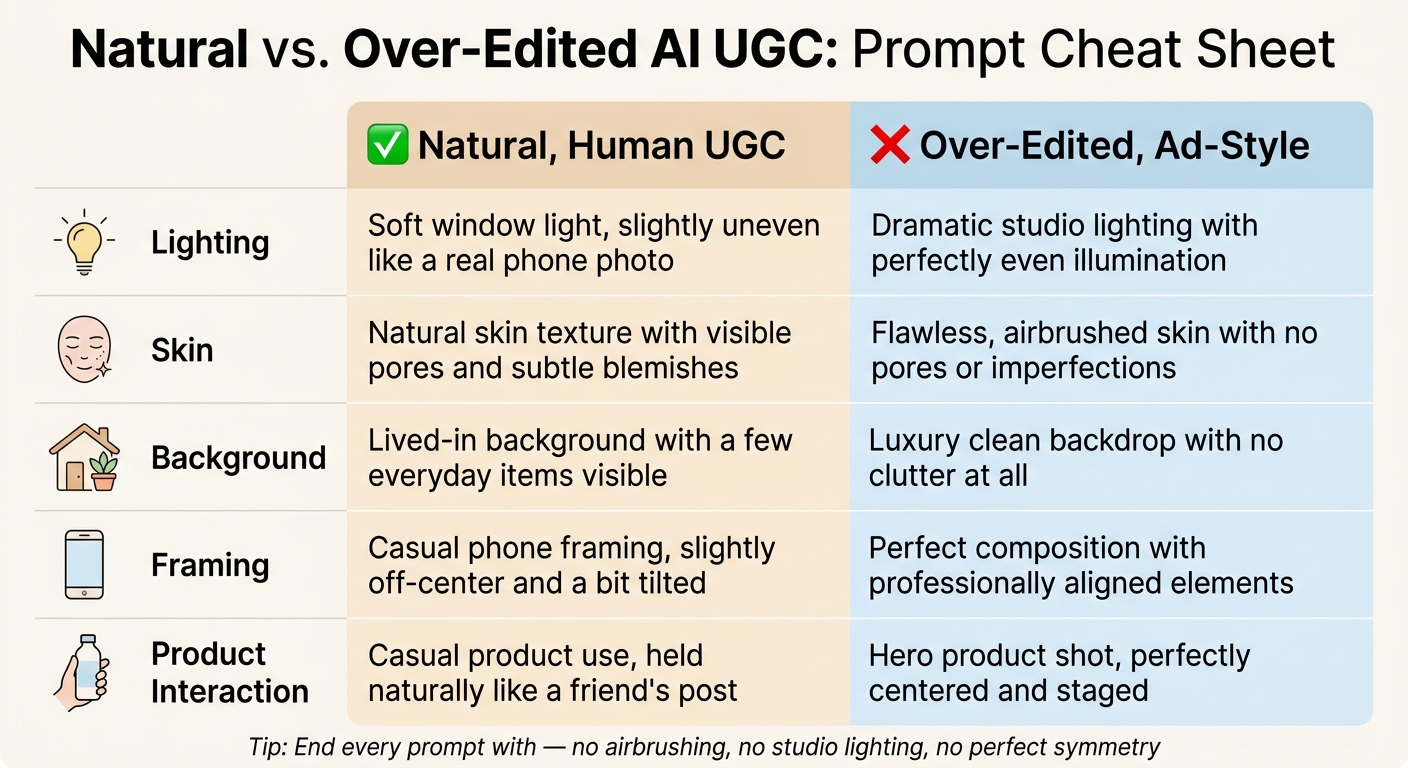
Natural vs. Over-Edited AI UGC: Prompt Cheat Sheet
| Area | What I’d tell AI to do | What I’d avoid |
|---|---|---|
| Lighting | Keep soft window light, slight shadow, phone-photo contrast | HDR, bloom, studio lighting, even glossy light |
| Skin | Keep pores, fine lines, and normal tone | Airbrushed skin, plastic texture, face-only color fixes |
| Background | Remove only the worst distractions | Fully cleaned, empty, showroom-style scene |
| Product area | Tidy near the product only | Spotlight effect, halo, fake glow |
| Framing | Keep handheld angle, off-center crop, phone feel | Perfect symmetry, ad-style layout, cinematic look |
I’d sum it up like this: if you want human-looking AI UGC, don’t ask for a prettier image. Ask for a more normal one. This authenticity is key to authentic engagement on social platforms.
People can spot over-edited UGC in a split second. What makes a photo feel human usually comes down to small things: uneven light, natural skin texture, lived-in rooms and backgrounds, framing that’s a little off, and the soft look phone cameras tend to create. None of these details scream for attention. They just quietly signal that an actual person took the photo. That’s why the prompts below zero in on realism cues, starting with lighting.
Most AI tools lean toward polish by default. They smooth skin, clean up light, and tighten the composition. And it often gets worse when the tool starts “improving” the image. In UGC, that polished look is the problem. A spotless background, perfectly balanced lighting, and airbrushed skin are exactly the kinds of details that make a photo stop feeling like something a real person would post, which is a core part of Instagram growth strategies that prioritize authenticity.
That’s the idea behind the 10 prompt formulas ahead: tell the AI what to keep, not just what to change. Each one gives you a short, copy-and-paste prompt formula, a brief note on why it works, and wording you can reuse when you want to avoid that over-edited look. The aim is simple: a phone-shot image that still feels untouched. First up: lighting realism.
A lot of AI tools make light look flat. That’s usually the first giveaway. So start here.
If the light looks off, everything else starts to feel fake too. The fix is simple: tell the model to keep the original light source, shadows, and color temperature instead of redoing the whole scene.
Anchor the light source in your prompt
Be specific about where the light comes from. Phrases like "soft window light from the left" or "natural indoor window light with soft shadows" give the AI a believable point of reference. That keeps the image grounded instead of making it look like it was lit on a set.
Use negatives to block polished effects
AI often tries to make images look too polished. That’s where negatives help. Use phrases like "no HDR, no bloom, no synthetic glow, no studio lighting" to stop that glossy look from creeping in.
You can also guide the shadows directly. For example: "keep soft shadows under the jawline and nose". Small details like that help the face keep its natural flaws, which is often what makes it feel human.
Lift exposure lightly
Brighten the face and product label just a little. Keep the background darker. Hold onto the grain and contrast. And avoid blown-out whites.
A prompt like this works well:
"Slightly brighten the subject's face and product label, keep the background one stop darker, retain natural noise and contrast, no blown-out whites."
Once the light feels natural, the next thing to check is the skin. Does it still look like actual human skin, or did the AI smooth it into plastic?
Once the light looks right, skin is usually the next thing that can ruin the illusion. A lot of AI edits smooth skin way too much. But real UGC doesn't look like that. You still see pores, fine lines, a bit of uneven texture, and small shifts in color.
1. Texture-first prompts
Tell the AI to keep skin texture instead of wiping it out. If you skip this, the image can slide into that overly filtered, fake-looking style.
"Preserve pores and fine lines, keep natural skin texture, no plastic skin, no airbrushed look."
When the texture feels natural, the next thing to check is skin tone.
2. Tone and undertone accuracy
AI can also change skin tone during editing. It might flatten the color, add an orange cast, or make skin look slightly ashy. The fix is simple: spell out what you want in the prompt.
"Maintain original skin tone, accurate undertones, no skin lightening, white balance correction for the whole image, not just the face."
This matters even more for deeper skin tones, where desaturation can make the edit feel off.
3. Localized cleanup
There's a big difference between removing a distracting blemish and erasing normal human features. Keep cleanup light and focused.
"Lightly reduce only standout blemishes, keep freckles, birthmarks, and natural redness on cheeks and nose, keep facial proportions unchanged, no heavy retouching."
After skin, the next step is cleaning up the background without making the shot look staged.
The background should look edited, not wiped clean.
1. Remove only what's truly distracting
Go after the obvious stuff first: wrappers, cords, harsh reflections, or busy patterns that pull your eye away from the product.
Subtly remove only the most distracting objects, keep a lived-in home look, no studio-clean background.
Leave the normal scene details alone, like chairs, windows, signs, and cups. Those little things help the image feel like a home, not a set. If the product still blends into the mess, clean up only the area closest to it.
2. Declutter around the product, not the whole frame
Focus the cleanup on the space around the product, not the entire photo. Keep the product in the same spot and at the same angle, and let the rest of the everyday scene stay in place.
Gently declutter around the skincare bottle, keep its original position and angle, leave the rest of the scene natural, no glow, halos, or spotlight effect.
This is where negative prompts help. They stop the edit from going too far and making the image look fake.
3. Use negatives to stop over-cleaning
Clear negative instructions help the AI stop at believable cleanup. Good phrases to use include "keep some clutter for authenticity", "no plastic or 3D-render look," and "keep smartphone texture and slight noise."
Clean only major floor distractions, keep some clutter for authenticity, no plastic or 3D-render look, keep smartphone texture and slight noise.
Once the background feels natural, tighten the framing so the shot still reads like a casual phone photo.
After cleanup, framing is the last signal that makes an image feel real.
1. Keep the original angle and let imperfection stay
Your framing prompt should hold on to the feel of a real phone photo. Most phone shots aren't perfect. The subject sits a bit off to one side. A doorframe sneaks into the corner. There's a touch too much space above the head. Those small flaws tell the viewer a person took the photo, which is why user generated content on Instagram is so effective.
If the AI fixes the composition too much, the image can look like an ad almost right away.
Lock the image to 4:5 or 9:16 and keep the original handheld angle. Then shape the rest of the prompt around what the photo already does well instead of trying to tidy everything up.
Subtle smartphone selfie edit, vertical 4:5 crop, keep original handheld angle, subject slightly off-center, natural headroom, product visible in hand, casual framing, preserve background depth and clutter, no studio or cinematic look.
Use off-center, handheld framing with a normal background. Skip polished terms like "cinematic" and "editorial."
These framing cues work with the wording table below, where small word choices help the edit stay natural.
These tips only work if every word pulls the image toward a phone-shot feel. If your prompt still sounds too polished, check it line by line against the natural-vs.-ad-style table below.
| Category | Natural, human UGC wording | Over-edited, ad-style wording |
|---|---|---|
| Lighting | "soft window light, slightly uneven like a real phone photo" | "dramatic studio lighting with perfectly even illumination" |
| Skin | "natural skin texture with visible pores and subtle blemishes" | "flawless, airbrushed skin with no pores or imperfections" |
| Background | "lived-in background with a few everyday items visible" | "luxury clean backdrop with no clutter at all" |
| Framing | "casual phone framing, slightly off-center and a bit tilted" | "perfect composition with professionally aligned elements" |
| Product interaction | "casual product use, held naturally like a friend's post" | "hero product shot, perfectly centered and staged" |
Use these swaps as a final check before you generate the image. Go row by row and replace any right-column phrasing with the left-column version.
Keep faces and labels readable, but don’t make them feel staged. Then finish with a negative phrase like "no airbrushing, no studio lighting, no perfect symmetry" to help reduce over-processing in skin and lighting.
These prompts work because they protect the signals people read as real. The best AI UGC edits look real, not polished to death.
Stick to one clear edit target and add 2–3 anti-polish phrases like "keep natural skin texture", "no studio lighting", and "maintain phone-camera look."
Before you post, do a quick gut check:
UGC that looks natural is easier to trust and more likely to perform. The goal is simple: a photo that feels native to a real feed. This approach helps you create a cohesive Instagram feed that resonates with your audience.
Use these prompt patterns like a quick checklist: preserve texture, keep natural light, and leave a little imperfection.
AI UGC photos often look fake when edits get too polished and lose that phone-camera feel. The usual giveaways are over-smoothed, plastic-looking skin, flat lighting that feels more like a studio than a real room, overly clean surfaces, bland backgrounds, and expressions that look stiff or off.
Heavy prompting or upscaling can also make the image invent details or add odd artifacts. On top of that, strong sharpening or fake grain can leave behind obvious edges, glitches, and other visual tells.
Use prompt terms like natural skin texture, visible pores, and freckles. That helps keep skin looking like skin, not a polished mannequin.
Add negative prompts to avoid beauty filters, perfect skin, plastic surfaces, and over-smoothed texture.
If you’re editing or upscaling, avoid aggressive smoothing. If skin still looks artificial, add subtle film grain and check details at 100% to 200% zoom.
Use negative prompts to block terms like studio lighting, perfect skin, beauty filters, and plastic-looking surfaces. That helps cut the overly polished, waxy, hyper-clean look.
When you leave those things out, natural texture and small imperfections stay in the image. The result feels much more like a real photo taken on a phone.


